

Woodworking Backwards
What could go wrong?


Having filled our house with furniture I have built, I am running out of projects and have turned to building pieces for our daughter. These include a vanity, a hall table, a stereo cabinet, and a coffee table. To keep her Dad from becoming idle and despondent, Erika recently asked if I would build another piece for her, specifically, a nice dresser to replace her IKEA model. I said, sure, why not? It can’t be that hard, can it?
For woodworkers, building “things” usually follows a pretty logical sequence—- the idea, the dimensions, the material, cutting and fitting, followed by gluing and finishing. Material hasn’t been a problem for me for decades. Being a scrounge at heart, I have accumulated at least a two-lifetime supply of heart pine and cherry, along with some tasty trimmings of Osage orange, ebony, holly, persimmon, purple heart, cocobolo, Sonoran desert ironwood, white oak, magnolia, cypress, and some rarities nobody has ever heard of that I dragged out of the woods.
It was a bonus that Erika wanted the dresser built from my two-lifetime-supply of heart pine which is mostly 2 x 10 floor joists salvaged from old buildings. Unlike some top woodworkers on the InterWeb, I don’t go for really rare and really expensive wood, something from the hinterlands of the Congo or Amazonia, dragged out of a remote and preferably endangered forest by underpaid locals in flip-flops, then sawn into boards in local sawmills without safety protocols for their barefoot employees.
As I negotiated the future piece with Erika, sketching out its major dimensions, it seemed to keep growing and eventually matured at sixteen drawers (far more than the IKEA dresser) as in the sketch below. As in several recent pieces, I didn’t want to build something purely rectilinear and boxy, so I added a curved front just for a challenge because it would require an exact match of curvature between the sixteen drawer fronts and the top and bottom of the dresser. It also meant that none of the drawer sides would be at right angles with their fronts. I guess we’ll see how hard all that will be, right?

Most woodworkers would build the case, then fit the drawers into the openings, but for some reason I can’t quite explain, I decided to build this dresser backwards—- the drawers first, then the case. Maybe it’s my contrariness, but I reasoned, hey, a dimension is a dimension, and if everything is cut exactly to the planned dimensions, building the case after the drawers should work just fine, and the drawers will all fit. At least, that was the theory.
So, I picked out and cut the beautiful grain-matched boards for the drawer fronts. So far, pretty easy, but initially they were flat (indeed, flat as a board!). How do I correctly curve each drawer front for its location in the dresser? Bending wood that thick was out of the question.

The curve was generated empirically by bending a piece of springy metal, so the solution was to use the same bent-metal to cut out two identical curved profiles and and then to mount each horizontal series of drawer fronts between these profiles, but slightly recessed (see image below). Rails attached to the router base could then be run back and forth and side to side on the edges of the profiles, therefore carving away wood with a flat bit until each series of fronts had the same profile as the curved guides. I repeated this for every row of drawer fronts. It produced a lot of chips. Also, the unique angles between drawer fronts and sides was another construction challenge. This is where a protractor applied to the sketch of the dresser top (above) directly provided the angles.

Routers are wonderful tools that cut cleanly, spinning as they do at 26,000 rpm, but what is not obvious at first is that they spew hot shavings directly at the user. If you work at eye level, you soon pick another level. Using the transparent shield that comes with the router to catch the spewed chips works for about 30 seconds before the shield gets gummed up and opaque, and then you can’t tell what you are doing. It’s another example of a machine’s feature that was never used by the guy who designed it. No sander that I have ever owned has had a vacuum bag that actually worked.

OK, now I needed the thinner stock for the drawer sides, bottoms and backs. Since most of my heart pine was in 2x10s up to 15 feet long, this meant a lot of re-sawing. This was more involved than you would think because of limitations of my table saw, to whit: the saw’s blade could only be raised 2.5 to 3 inches, not nearly enough to cut a 2x10 into two 1x10s. So, first I made two 2x5s, then four 1x5s. But with a saw extension of only about three inches or so the 1x5s could not be done in one pass. Instead, on the first pass I ran the 2x5 through the table saw for a 2.5 inch cut (i.e. half the width), then flipped it over for the second pass to end up with two 1x5s that I then edge glued together to make a 1x10. Did you follow that?
Even so, this might have to be repeated to get the desired final thickness because sawyers over a century ago were not as fussy as to the exact thickness of the nominal “2-inch” joists and they ranged from two to over three inches thick. To convert the >1x 5s into approximately 3/4 x 5 or into two 3/8 x 5s I had to repeat this procedure. By the end, the neighbors were probably tired of the noise, the sawdust spilled out from under the table saw, and the pile of scraps threatened to collapse. Building furniture from solid lumber is amazingly wasteful.
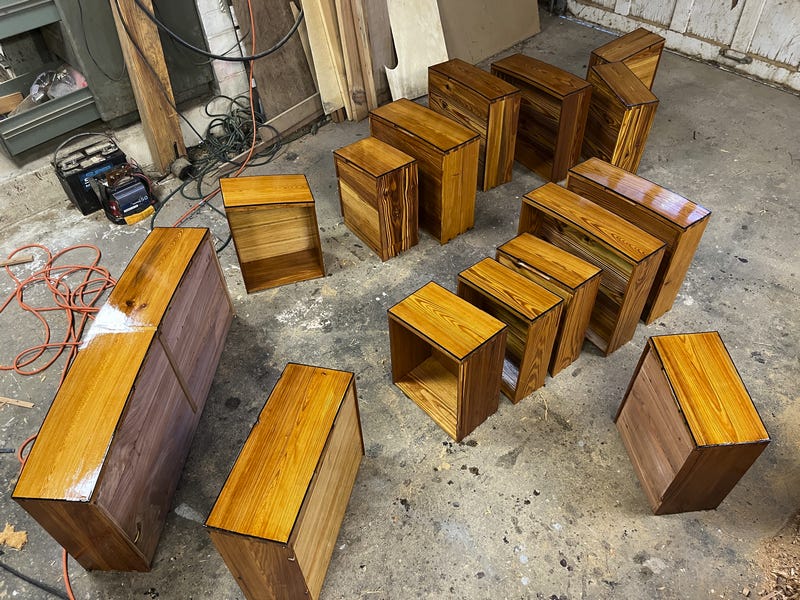
Each drawer was built of five pieces, so that the sixteen drawers were assembled from the 80 pieces stacked up below. Drawer sides were dovetailed at both ends. I marked all dovetails from a metal template so they would all be the same, then clamped each stack of each part in a vise (i.e. all fronts, all sides or all backs), scribed guiding lines on the stack and used a freehand router with a dovetail bit to cut the dovetails. If I had cut the dovetails individually in each piece, I would have been driven mad, and probably made a lot of goofs. A perfect fit required some final paring with a chisel and as a result the pieces were not as perfectly interchangeable as they should have been, requiring that I number all the parts to keep them matched correctly. Anyway, the sides obviously had diverse lengths.

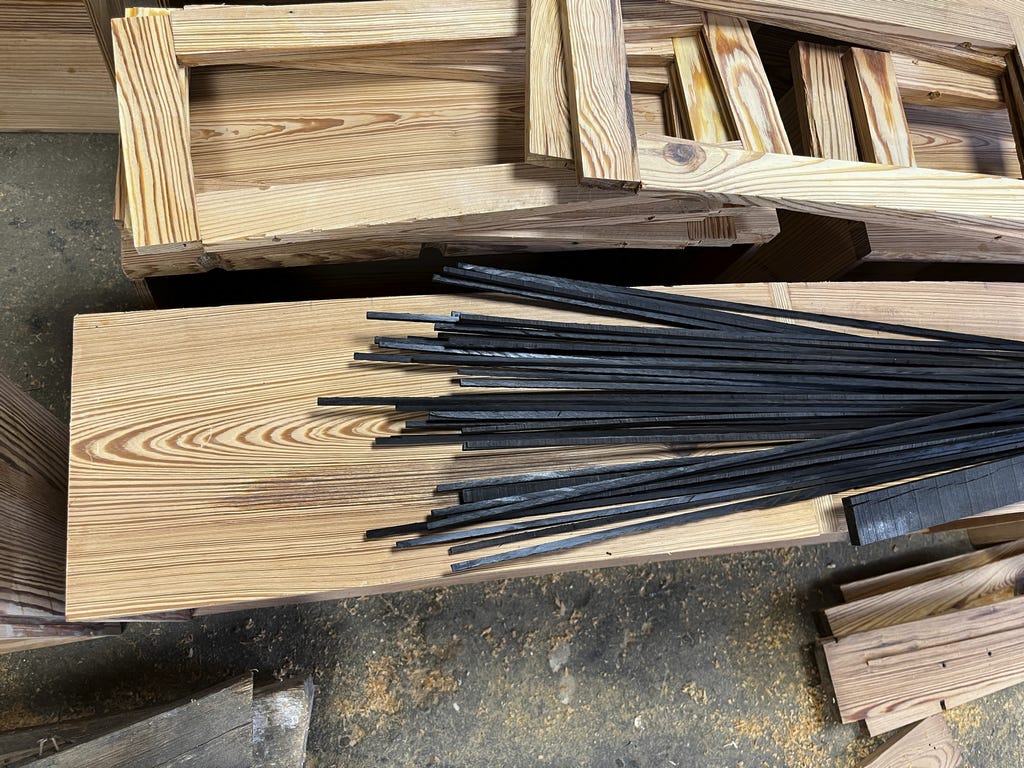
I intended to use my signature ebony edge trim on the drawer fronts. My ebony supply was a bunch of second-grade guitar fret boards that I bought cheap from a guy in Portland 35 years ago. I try not to waste it (that is why I still have quite a bit), so I cut it with a small, super-thin, cheap Chinese saw blade I ordered on the web. It made a kerf of only one mm, and thus wasted a minimum of my precious ebony. The ebony strips were cut slightly oversized for the one-eighth inch rebates in the drawer sides and edges into which they were glued and held with tape until the glue set. Planing, scraping, or routing off the excess ebony made the trim exactly flush with the drawer fronts and edges.
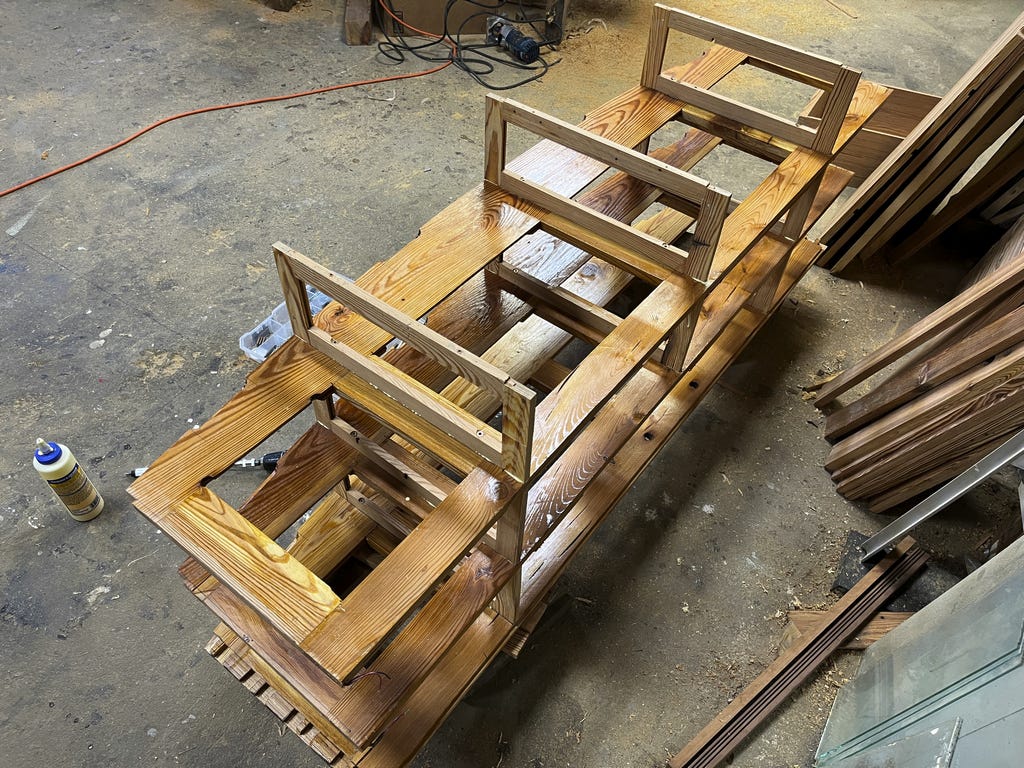
Along with the assembly of the drawers, I mortised and tenoned 68 pieces to be assembled into the 12 vertical and four horizontal dividers that, with the top, ends, and bottom would create the sixteen openings into which the drawers would (I hope) fit. Each divider was assembled, glued, and clamped. Getting their dimensions correct was crucial to getting the drawers to fit down the line. As with all the other parts, dimensions swam in my head day and night, found a life on paper, and were checked and rechecked a dozen times each. My RAM was packed.
Assembling and gluing all these pieces into 16 drawers and 12 dividers was a bit repetitive (to say the least), but then, a lot of woodworking actions are. As the saying goes, if you can’t stand the repetition, stay out of the wood shop! With the drawers assembled and glued, I gave them their triple polyurethane coats, ignoring the (imagined) sneers of top woodworkers. Now I could turn my attention to assembling the case, the parts of which still needed some trimming to size.
To save weight and wood, the horizontal dividers were complex constructions with curved fronts, dadoes for the vertical dividers, and grooves to hold the wires for the strip LED lights that were to come. At the back of each space for a drawer was a microswitch that would be off when the drawer was closed and would allow current to flow to the LEDs when open. The LEDs were mounted on a down-oriented bevel at the front so they would cast light on whatever dark stuff Erika intended to store in her drawers.

The dresser sides were joined to the top with routed dovetails, and were also supplied with dadoes to receive the ends of the horizontals after I had trimmed them to the correct length, a tricky, very empirical maneuver. The bottom edges of the sides were also dovetailed to the horizontal bottom, but this was only possible after the provisional assembly of the whole dresser so the location and spacing of these dovetails could be determined. Another tricky, empirical maneuver.


If there was any moment in which the “exact-measurement-chickens” came home to roost, this was it. But mirabile dictu, it worked! Now I could assemble and glue the dresser case, always a tense moment because this step is essentially irreversible. Once complete, the stage was set for the final phase of fitting each drawer into its predetermined slot. In this regard, my exact measurements fell a bit short in several cases so that drawers had to be trimmed and planed to run freely. This was a bit tricky because all the drawers were already glued up, and their parts could not be trimmed separately to change the drawers’ dimensions. This was the price I paid for doing the drawers first. The reason for the errors was that the exact location of a couple of the vertical dividers was off by a small fraction of an inch, and I had to add or chisel away some of the wood to get the openings to the intended dimensions and the drawers to fit. How this error came to be was a mystery. Maybe I twitched when I made the location marks.
When a drawer bound, the site of binding was often hard to figure out, and many times, what seemed like a minuscule, insignificant trim made the drawer run. One by one, I sized, trimmed and planed the drawers to run freely in their slots, using candle wax as a lubricant. Some were tedious to fit, with many repetitions of trimming, fitting, and cussing until the drawer ran freely.

So to recap. The whole shootin’ match of 152 pieces was now assembled, glued, and ready for its final coats of polyurethane. All the drawers now ran freely, and the lights turned on like magic when each drawer was opened and the microswitches did their thing, sending 12v DC to the LED strips over the front, spilling bright light into dark recesses. I also replaced the originally-planned fancy feet with a recessed plinth that was more in line with the design. After three or four coats of polyurethane, the heart pine wood glowed with the color of honey (see image at the top of this essay) and the dresser was ready to be shipped to Erika in Chicago. It arrived in a few days and now is doing its job in Erika’s apartment. The IKEA dresser that it replaced has gone to its heavenly reward by way of a charity.
Looking back on my backwards woodworking, was I correct to believe that if you stuck to the exact planned measurements everything would go together smoothly and without problems? Well, yes, sort of, but it demands that you actually stick to and achieve those measurements, and in several cases I seem to have deviated by a small amount for unknown reasons, leading to the tedious and often mysterious fitting procedure described above. Well, nobody’s perfect are they? I certainly got it all close enough for government work, and then was able to correct most of the errors.
So far, Erika has not reported that the whole thing has exploded into flinders and kindling.
What more could I ask?

It’s a well-worn phrase, but certainly appropriate here: Walter, you never cease to amaze me.
I recall your detailed construction of the dressing table for your daughter. It was amazing, but the work required for this project is staggering. You certainly enjoy a challenge and work it through, emphasis on the work. My admiration of the result and of you are HUGE! Thanks for your writing as well which also is excellent.