Silver Magic
A moment in light


Note: I recently joined a session “for photographers” that made me realize that none of the attending photographers had a clue about how silver photography worked or what it involved. Theirs was a totally digital world. This essay is my response to this realization.
Anyone who has processed silver-based photographs and negatives has at least been exposed (ha!) to something very close to magic. Although the chemistry and physics of this process are well-understood, one would have to be deliberately insensitive not to feel that something magical was happening as an image appeared on a piece of photographic paper in a developer bath under the red light of a darkroom.
The basis of this magic lies in the insoluble, crystalline precipitate that forms when you mix a silver nitrate solution in gelatin with a solution of one or more of the halogen salts —- chloride, bromide, or iodide. The result is a suspension of tiny, light-sensitive silver halide crystals in colloidal gelatin that can be coated on glass, film or paper in the dark, thereby preserving its light-sensitivity.
Although there are photographic processes that produce a direct positive image, the vast majority of silver-based photography first produces a negative of the image from which a positive print or transparency can be made. Until the invention of roll film in the early 20th century, the photosensitive emulsion was coated (in the dark) on glass plates. Nineteenth century photographers traveled with a lot of equipment, often wagon loads, and made the emulsions shortly before they exposed them. Their plates were mostly sensitive to the blue end of the spectrum (i.e. orthochromatic), so the sky, being bright blue, was always overexposed. A major advance in emulsions was the addition of dyes to extend the sensitivity into the red end of the spectrum (panchromatic).
Dried coatings were a major advance in convenience, followed by emulsion coats on flexible rolls of transparent cellulose nitrate film, an invention that opened the era of small, easily-carried cameras that just about anybody could use. The highly flammable cellulose nitrate (gun cotton) was later replaced by cellulose acetate to become “safety film.” Such film, as well as photographic paper could be processed by professional labs or in home darkrooms.
The magic begins in a light-tight box, the camera, within whose lens is a shutter that can be opened briefly to allow a focused image of light to fall on the silver halide-gelatin emulsion on the acetate film in the back of the camera. When a photon of light strikes one of these tiny crystals, it knocks an electron out of its resting place and reduces the silver halide to an atom of chemically active, metallic silver. When a crystal has accumulated four or more such silver atoms, it is “developable,” that is, the entire crystal can be converted into metallic silver with a chemical developing agent to create a tiny black dot on the film. The more displaced electrons in a crystal, the more atoms of metallic silver, and the more chemically-reactive that crystal will be to development. The more light falling locally, the greater the fraction of crystals that are developable, and the darker that spot will be after development. Thus, the light and dark areas projected by the lens form a latent image of chemically activated silver salts (although a negative one) that reliably records the brights and darks as regions of varying silver density.
The relationships among exposure, developer chemistry, time, concentration, temperature, and agitation are so complex and nuanced that silver photography is essentially a “craft,” learned by experience, trial-and-error, communication with similarly focused (ha! again) photographers who trade a lot of “recipes”, aided by the science of the photographic industry.
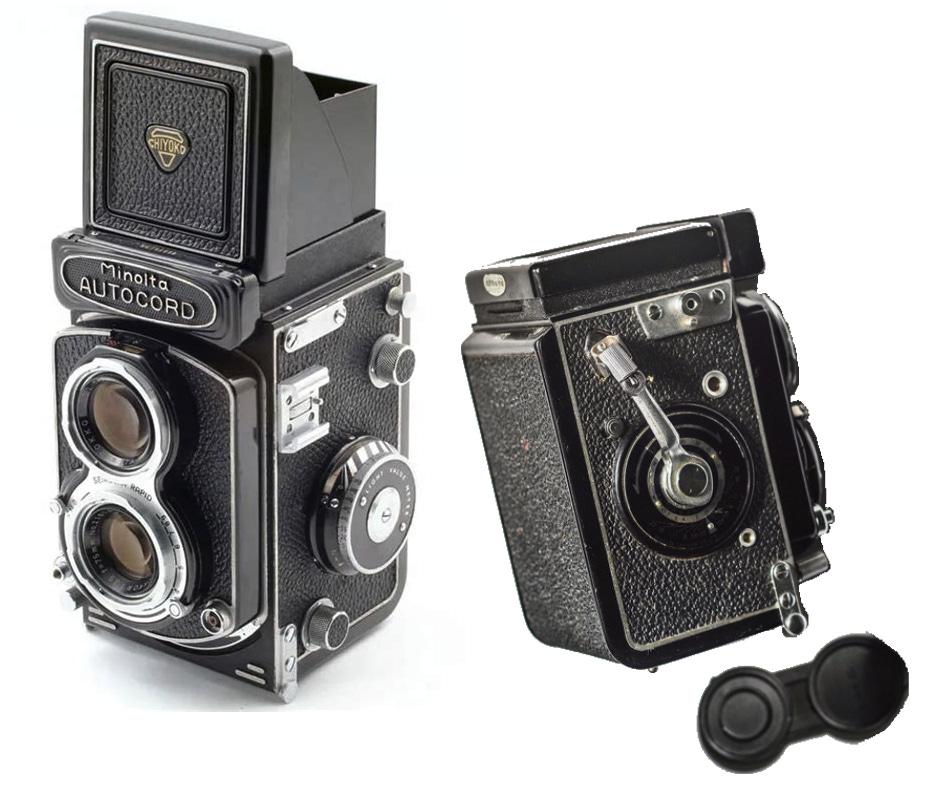
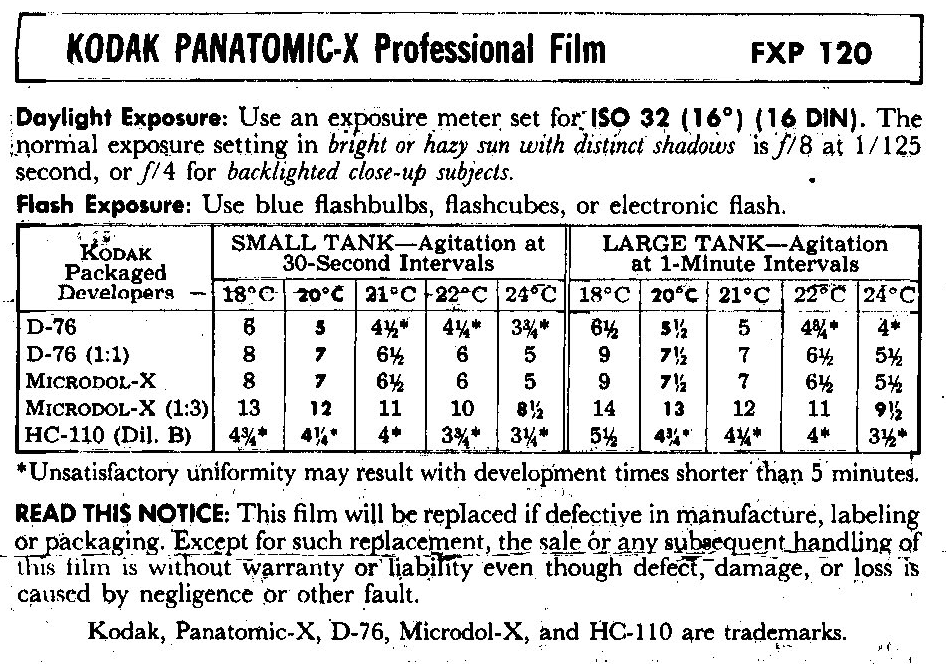
Among the many choices of camera (at least among the affordable ones), my favorite was the Minolta Autocord, a twin-lens reflex, designed for 70 mm-wide film (2.25 inches). The shutter speed ranged from “timed” (kept open) to 1/500th of a second, and the iris (aperture) ranged from f/3.5 to f/22. The right combination of aperture and shutter allowed just the right amount of light for the speed of the film. The higher the f/ratio, the greater the depth of field in the image. Film was available in a wide range of light-sensitivity (film speed) standardized by an international organization (ISO).
To make films of these various speeds, manufacturers vary the size of the silver halide crystals through “ripening”, a process in which some crystals grow as others get smaller. This increases the film speed, because bigger crystals are bigger targets and are therefore more likely to be hit by incoming photons and to become developable. The downside of faster film, as every photographer knows, is that larger crystals are visible as increased “graininess” of the image, as well as a decreased ability to resolve tiny details. Because I seldom photographed fast action, I always preferred fine-grained, slow film with high resolution, and often used a tripod to allow longer exposures.
Having exposed the film in the camera, the next step is to develop the activated latent image into a visible image. You can’t see this development happen before your eyes, because it must be carried out in the dark. So the film is wound on a reel by feel in complete darkness and placed in a light-proof tank that allows chemicals to be poured in or out. Mine was a stainless steel tank like the one below. Winding the film took some practice, and was harder for 70 mm film than for 35 mm. Messing up meant layers of film sticking together and ending up with undeveloped spots. Aaargh!

With the film on the reel inside the (now closed) tank, you can come out of the dark room to pour the chemical developer into the tank. As I mentioned, crystals with more reactive sites are converted faster into more silver, making the area darker and more opaque. But some kinds of developers act relatively faster on more exposed crystals than on less exposed ones, increasing the image’s contrast, while others act opposite and decrease contrast. In practice, many developers are mixtures of these two kinds of agents, and are part of the craft of photography. Contrast can also be manipulated by particular combinations of exposure and development. Thus, the relationship between developed density (darkness) and exposure depends on both the exposure and the development—- too much or too little of both is possible, hence the detailed instructions that come with each roll of film.
The developer is chemically used up in the process, so if your developer was not fresh, you would need to compensate in time, or overcome the urge to be a cheapskate, and make up fresh developer. During development, it is important to agitate at just the right intervals and in the right way. Why is this important? Film areas that received more light use up developer faster, reducing developer concentration compared with less exposed neighboring areas. Agitation evens out developer concentration over the whole film, or at least that is the intention. Because the unexposed film edges did not use up developer, “edge-burn” (areas of over-development of the image edges) is a common problem. You wouldn’t think that there was an art to shaking or twirling a developing tank, but in fact, too much, too vigorous, or too little agitation leads to less than ideal outcomes.
After the right elapsed time, you pour the developer out of the tank, and replace it with “stop bath”, usually dilute acetic acid. This stops development in its tracks because development requires an alkaline pH. At this point, still invisible in your dark little tank, you have a developed negative image, but it is still embedded in an undeveloped silver halide emulsion that, if it were exposed to light, would darken and ruin your prize-winning photo.
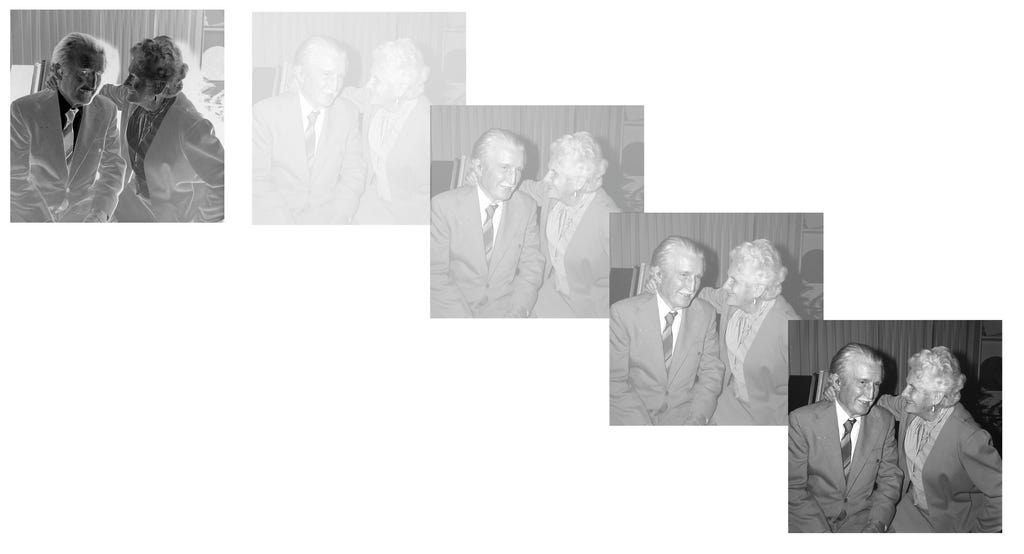
So you pour out the stop bath, and pour in the “fixer”, a solution of sodium thiosulfate (or similar) to dissolve the undeveloped silver halide, leaving behind a silver image on a transparent acetate film. With the silver halide gone (recovering silver from used-up fixer was once a profitable business), you wash out the residual fixer in running water, dry the film, and you have the final negative with the full range of tones from white to black, as below.

You now have a fine negative, assuming that you developed the film with the appropriate developer for that brand of film, at the right dilution, the right temperature and the right length of time, and have agitated the developing tank at just the prescribed intervals and with the right amount of vigor.
Now some math: for a given development regime, density increases with the logarithm of the exposure, i.e. it is related to multiples of the exposure, and is not additive. This is why camera shutters and apertures are graduated in factors of two: f-stops and shutter speeds. Opening the camera aperture one f-stop doubles the exposure. The same is true if you change the shutter speed from 1/60th of a second to 1/30th. Note that if you stop the iris down by one f-stop, but increase the shutter speed by one stop, the product of the two gives the same exposure, i.e. shutter speed and aperture are in a reciprocal relationship.
This sounds like a nice thing because for very dim scenes, you can just expose the film for longer, right? But not so fast! At very low light, film is less sensitive to light than its manufacturer’s rating (“reciprocity failure”), and long exposure will not completely compensate for low light, and will not produce the hoped-for result.
So far, all this complex hoopla has only produced a negative, not the print you want to hold in your hand or show to your Mom. The next magic step converts the negative image into a positive one by projecting it onto a piece of paper coated with a silver halide emulsion. The process is similar to film, but the paper is not sensitive to red light like film, so we can work under red light in a dark room, and watch the image appear on a sheet of photographic paper in a tray of developer. We’ve all seen movies where critical scenes take place under red light in a darkroom, haven’t we?

Negative size is set by your camera and the film it uses, but with an enlarger, the positive print can be made in any size (well, sort of). We now repeat exposure, development, density and contrast to produce a fine print, but because we are working under red light, we can fiddle these conditions by trial and error using test strips of photo paper. This can be tedious and time-consuming, especially if the negative is very uneven, too contrasty, or not contrasty enough. But we can block most or parts of the projected image to darken or lighten parts as needed (“dodging and burning”). Traditionally, one had multiple photographic papers in different contrast grades on hand, but eventually the industry introduced “polycontrast” paper whose contrast grade could be changed with colored filters in the enlarger.
Having exposed the paper to the negative image, we place it in the developer bath until it has reached the desired darkness, or darkening has slowed to a snails pace, then move it to the acidic stop bath, and then the fixer to dissolve the undeveloped silver halides. This is followed by a long wash in running water to remove the last traces of fixer, otherwise your print will yellow or develop blotches. Finally, the print is air dried, or it can be dried on a mirror-polished, heated steel drum to give it a glossy surface. The reward of this long, demanding process is a photographic print that will endure for centuries, recording a fraction of a second of your time here on earth.
But who among us still makes photographs with silver-based film? Except for a few very particular die-hard, nostalgic, or very contrary, photographers, most of today’s photos are “digital.” Many of the parameters and visual outcomes of digital photography are similar to those with silver: the sensitivity to light, contrast, resolution, saturation, reciprocity, and color (which I have not dealt with in this essay) are all factors to consider and manipulate. But whereas the products of silver photography are tangible pieces of film or paper whose images are composed of tiny grains of real silver, the images of digital photography are electrical: quantum responses of millions of tiny photo-diodes, light sensitive transistors, whose output, after arcane computations, is made visible in the glowing phosphors of screens or tiny dots of ink on paper.
But let’s focus on a much broader view. The transition from silver to digital is but the latest advance in over 70,000 years of recording the visual world, a technology that began with drawings scratched or painted with pigments on cave walls, later on animals skins, paper, canvas, wood, accompanied by ever more sophisticated paints and painters who rendered how light registered in their brains or their imaginations, until in the early 19th century, the ability of light itself to produce images was discovered, with silver-based photography dominating the various methods, only to be replaced by electronic blips in the late 20th century.
This evolution of what we can call “imaging technology” over these thousands of years shares an attribute with most other technologies—- it made a task less work, better, easier, faster, more available, more effective, and cheaper (think story-telling, to writing, to printing, to word processing). Also like many other technologies, the pace of innovation tended to speed up. Had I been a 19th century photographer, I would have hauled around a portable darkroom on a wagon loaded with a lot of expensive equipment, glass and chemicals. In addition, I would also have had to feed a horse or mule.
When roll film in small cameras replaced glass plates, anybody could do it, with a lot less equipment and cost. With the advent of happy-snappy cameras with their automatic, electronic exposure and focus followed by automated commercial processing reduced the cost still more, increased the ease, and multiplied the per-capita pictures by factors of ten. Finally, the computed quantum responses of grids of photo-diodes in digital cameras replaced silver (an element that cost real money) with electronic code, opening a world in which floods of billions of almost free digital images blur our vision of what is real and what is not.
Images have played a role in human memory for millennia, from the earliest cave paintings, to the Neolithic rock shelter paintings, to pre-Columbian America, Mesopotamia, Assyria, the classical empires of Greece, Egypt, Rome and beyond. All were records of some approximation of artists’ visions, most of them pretending to have some relationship to reality. With the invention of photography, the artists’ perception and brain were largely short-circuited, and something akin to a frozen moment of reality resulted. What would our historical memory be without photography? How would we imagine the American civil war, westward expansion, native Americans, major wars, world explorations and so on without the record of millions of black and white images? Come to think of it, if photography had existed during the Neolithic Era, how would we imagine its mammoths, mastodons and dire wolves ? But the digital world has begun to thaw that frozen moment of time, creating “moments” that bear little relationship to reality. We hardly have to imagine those mastodons, mammoths, and dire wolves: they already roam among us.
I wrote that roll film was invented in the early 20th century, but Charles Badland pointed out that it was invented in the late 19th century. Eastman's first roll-film camera was introduced in 1888. A huge success!
Good to read this! In addition to digital practice, I am trying to do analogue photography again...with a Rolleiflex twin lens that has in the past made beautiful images. Silver prints are just deeper than digital prints. I have a few on Instagram at dfhphotographs.